https://developers.google.com/gmail/api/quickstart/ios?hl=ja&ver=swift
ちなみにこのチュートリアル通りにやると動きません。
iOS9が出たばかりの時にやり始めたので、iOS初心者の自分としては、チュートリアル通りに書いても動かないという状態から抜け出すのに、かなり時間を取られました。
上記のサイトは英語で書かれているので、英語に自信のある方はどうぞ。
そうじゃない方は下記のサイトが参考になります。
ただし、参考にするのは「Gmail APIを有効化する」するところまで。
http://hazakurakeita.hatenablog.com/entry/2015/08/26/Swift%E3%81%A7Gmail_API%E3%82%92%E5%88%A9%E7%94%A8%E3%81%99%E3%82%8B%E6%96%B9%E6%B3%95_/_Gmail_API_iOS_Quickstart
それ以降に関してはCocoaPodsを使ってやった方が早いので、今回はCocoaPodsを使ってやっていきます。
CocoaPodsのインストールがまだ済んでいない方は、各自インストールしておいてください。
では、GmailAPIを有効化して、クライアントIDとクライアントシークレットが確認できたところから開始します。
まずXcodeで適当なプロジェクトを作成します。
自分は「gmailTutorial」というSingleViewApplicationのプロジェクトを作成しました。
作成したディレクトリは下記の通り。
/Users/user_name/Document/iPhoneApps/gmailTutorialプロジェクトを作成したら一旦作ったプロジェクトは閉じます。
作成したプロジェクトのディレクトリへ移動し、Podfileを作成します。
cd /Users/user_name/Document/iPhoneApps/gmailTutorial
vi Podfile
platform :ios, "7.0"
pod 'Google-API-Client'
上記まで書けたら保存して閉じます。
で、インストール。
$ pod install
Updating local specs repositories
Analyzing dependencies
Downloading dependencies
Installing Google-API-Client (1.0.422)
Installing gtm-http-fetcher (1.0.141)
Installing gtm-oauth2 (1.0.126)
Generating Pods project
Integrating client project

[!] Please close any current Xcode sessions and use `gmailTutorial.xcworkspace` for this project from now on.
Sending stats
Pod installation complete! There is 1 dependency from the Podfile and 3 total
pods installed.
現在の階層に作成されている「gmailTutorial.xcworkspace」をXcodeで開きます。
で、プロジェクトナビゲーターの、
Pods → Pods → Google-API-Client → Gmail → GTLGmail.h
を
gmailTutorial → gmailTutorial → GTLGmail.h
にドラッグアンドドロップする。
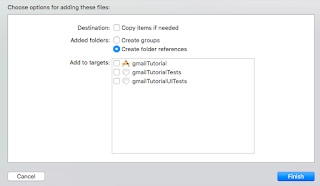
下記のような画面が出てくるが、そのままfinishボタンを押す。

続いて、
Pods → Pods → gtm-oauth2 → GTMOAuth2ViewControllerTouch.h
を
gmailTutorial → gmailTutorial → GTMOAuth2ViewControllerTouch.h
にドラッグアンドドロップする。
先ほどと同じく、そのままfinishボタンを押す。
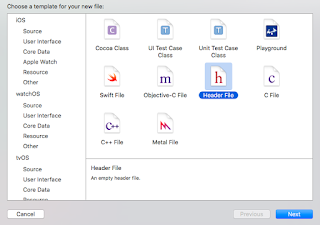
次に、SwiftからObjective-Cのライブラリを呼び出すために必要なBridgeファイルを作成する。
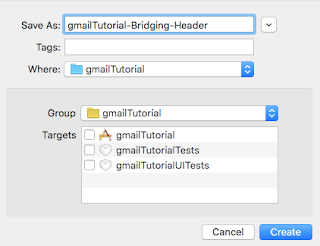
作成するBridgeファイルの名前は下記の通りとする。(各自プロジェクトに置き換えて作成してください。)
gmailTutorial-Bridging-Header.h
先ほどのブリッジファイル名を入力して作成する。

ファイルの中身は下記の通り。
#ifndef gmailTutorial_Bridging_Header_h
#define gmailTutorial_Bridging_Header_h

#import <GTMOAuth2ViewControllerTouch.h> ← これを追記
#import <GTLGmail.h> ← これを追記

#endif /* gmailTutorial_Bridging_Header_h */
続いて、プロジェクトナビゲーターの「gmailTutorial(アイコンが青色のやつ)」をクリックし、真ん中の画面に出てきたBuild Settingsのメニューを選択 Objective-C Bridging Headerの項目にgmailTutorial-Bridging-Header.hファイルのパスを記載する。
$(SRCROOT)/$(PROJECT)/$(SWIFT_MODULE_NAME)-Bridging-Header.hこんな感じで記載すると、確定したタイミングで実際のパスに書き換えてくれる。
階層構造が異なっている場合は、不要な部分を削除してください。
続いて、チュートリアルに書かれているSwiftのコードをコピペして使えれば良かったのだが、Xcode7でiOS9に対応させようとするとエラーが出る箇所があるので、下記ソースをコピペして下さい。
import UIKit

class ViewController: UIViewController {

    private let kKeychainItemName = "Gmail API"
    private let kClientID = "YOUR_CLIENT_ID_HERE"
    private let kClientSecret = "YOUR_CLIENT_SECRET_HERE"

    private let scopes = [kGTLAuthScopeGmailReadonly]

    private let service = GTLServiceGmail()
    let output = UITextView()

    // When the view loads, create necessary subviews
    // and initialize the Gmail API service
    override func viewDidLoad() {
        super.viewDidLoad()

        output.frame = view.bounds
        output.editable = false
        output.contentInset = UIEdgeInsets(top: 20, left: 0, bottom: 20, right: 0)
        //output.autoresizingMask = UIViewAutoresizing.FlexibleHeight |
        //    UIViewAutoresizing.FlexibleWidth
        output.autoresizingMask = UIViewAutoresizing([.FlexibleHeight, .FlexibleWidth])

        view.addSubview(output);

        GTMOAuth2ViewControllerTouch.authForGoogleFromKeychainForName(
            kKeychainItemName,
            clientID: kClientID,
            clientSecret: kClientSecret
        )

    }

    // When the view appears, ensure that the Gmail API service is authorized
    // and perform API calls
    override func viewDidAppear(animated: Bool) {
        if let authorizer = service.authorizer,
            canAuth = authorizer.canAuthorize where canAuth {
                fetchLabels()
        } else {
            presentViewController(
                createAuthController(),
                animated: true,
                completion: nil
            )
        }
    }

    // Construct a query and get a list of upcoming labels from the gmail API
    func fetchLabels() {
        output.text = "Getting labels..."

        //let query = GTLQueryGmail.queryForUsersLabelsList()
        let query = GTLQueryGmail.queryForUsersLabelsList() as! GTLQuery
        service.executeQuery(query,
            delegate: self,
            didFinishSelector: "displayResultWithTicket:finishedWithObject:error:"
        )
    }

    // Display the labels in the UITextView
    func displayResultWithTicket(ticket : GTLServiceTicket,
        finishedWithObject labelsResponse : GTLGmailListLabelsResponse,
        error : NSError?) {

            if let error = error {
                showAlert("Error", message: error.localizedDescription)
                return
            }

            var labelString = ""

            if !labelsResponse.labels.isEmpty {
                labelString += "Labels:\n"
                for label in labelsResponse.labels as! [GTLGmailLabel] {
                    labelString += "\(label.name)\n"
                }
            } else {
                labelString = "No labels found."
            }

            output.text = labelString

    }


    // Creates the auth controller for authorizing access to Gmail API
    private func createAuthController() -> GTMOAuth2ViewControllerTouch {
        //let scopeString = " ".join(scopes)
        let scopeString = scopes.joinWithSeparator(" ")
        return GTMOAuth2ViewControllerTouch(
            scope: scopeString,
            clientID: kClientID,
            clientSecret: kClientSecret,
            keychainItemName: kKeychainItemName,
            delegate: self,
            finishedSelector: "viewController:finishedWithAuth:error:"
        )
    }

    // Handle completion of the authorization process, and update the Gmail API
    // with the new credentials.
    func viewController(vc : UIViewController,
        finishedWithAuth authResult : GTMOAuth2Authentication, error : NSError?) {

            if let error = error {
                service.authorizer = nil
                showAlert("Authentication Error", message: error.localizedDescription)
                return
            }

            service.authorizer = authResult
            dismissViewControllerAnimated(true, completion: nil)
    }

    // Helper for showing an alert
    func showAlert(title : String, message: String) {
        let alert = UIAlertView(
            title: title,
            message: message,
            delegate: nil,
            cancelButtonTitle: "OK"
        )
        alert.show()
    }

    override func didReceiveMemoryWarning() {
        super.didReceiveMemoryWarning()
        // Dispose of any resources that can be recreated.
    }

}
以上でチュートリアルの内容は終了。
YOUR_CLIENT_ID_HEREとYOUR_CLIENT_SECRET_HEREは、各自書き換えて使って下さい。
書き換えた部分はコメントアウトしてあるので、見てもらえればわかるかと思います。
ログインするとGmailのラベルの一覧が表示されるはず。