page_adsence

2015年11月24日火曜日

CentOS6系とCentOS7にDockerをインストール

CentOS6系と、CentOS7系にそれぞれDockerをインストールしてみました。
現時点でDockerの最新バージョンは1.8系ですが、CentOS6系だと、Docker1.7系までしか使えませんので、
最新版のDockerを使いたい場合は、自動的にCentOS7系を使うことになります。

CentOS6.7にDockerをインストール

まず、面倒な方から。
CentOS6系でDockerをインストールするためには、EPELのリポジトリを追加して、そこからインストールする必要があります。
但し、追加したEPELリポジトリ内にある、dockerというのは全くの別物なので要注意。
早速、EPELのリポジトリを追加します。
sudo rpm -ivh http://ftp.jaist.ac.jp/pub/Linux/Fedora/epel/6/i386/epel-release-6-8.noarch.rpm

インストールしたくない方のdockerの情報を確認。
$ yum info docker
読み込んだプラグイン:fastestmirror
Loading mirror speeds from cached hostfile
epel/metalink                                                                      | 5.5 kB     00:00
 * base: ftp.yz.yamagata-u.ac.jp
 * epel: ftp.kddilabs.jp
 * extras: ftp.yz.yamagata-u.ac.jp
 * updates: ftp.yz.yamagata-u.ac.jp
epel                                                                               | 4.3 kB     00:00
epel/primary_db                                                                    | 5.7 MB     00:03
利用可能なパッケージ
名前                : docker
アーキテクチャ      : x86_64
バージョン          : 1.5
リリース            : 5.el6
容量                : 19 k
リポジトリー        : epel
要約                : KDE and GNOME2 system tray replacement docking application
URL                 : http://icculus.org/openbox/2/docker/ ← URLが全然別物。要約も全く別物
ライセンス          : GPL+
説明                : Docker is a docking application (WindowMaker dock app) which acts as a system
                    : tray for KDE and GNOME2. It can be used to replace the panel in either
                    : environment, allowing you to have a system tray without running the KDE/GNOME
                    : panel or environment.

CentOS6.7の場合だとdocker-ioというのが、インストールしたいDockerになります。

 yum info docker-io
読み込んだプラグイン:fastestmirror
Loading mirror speeds from cached hostfile
 * base: ftp.yz.yamagata-u.ac.jp
 * epel: ftp.kddilabs.jp
 * extras: ftp.yz.yamagata-u.ac.jp
 * updates: ftp.yz.yamagata-u.ac.jp
利用可能なパッケージ
名前                : docker-io
アーキテクチャ      : x86_64
バージョン          : 1.7.1
リリース            : 2.el6
容量                : 4.6 M
リポジトリー        : epel
要約                : Automates deployment of containerized applications
URL                 : http://www.docker.com ← Docker公式サイトのURLになっている
ライセンス          : ASL 2.0
説明                : Docker is an open-source engine that automates the deployment of any
                    : application as a lightweight, portable, self-sufficient container that will
                    : run virtually anywhere.
                    :
                    : Docker containers can encapsulate any payload, and will run consistently on
                    : and between virtually any server. The same container that a developer builds
                    : and tests on a laptop will run at scale, in production*, on VMs, bare-metal
                    : servers, OpenStack clusters, public instances, or combinations of the above.

docker-ioが正しい事を確認したので、yumでインストールする。
$ sudo yum install docker-io
読み込んだプラグイン:fastestmirror
インストール処理の設定をしています
Determining fastest mirrors
epel/metalink                                                                      | 5.5 kB     00:00
 * base: www.ftp.ne.jp
 * epel: ftp.kddilabs.jp
 * extras: www.ftp.ne.jp
 * updates: www.ftp.ne.jp
base                                                                               | 3.7 kB     00:00
base/primary_db                                                                    | 4.6 MB     00:03
epel                                                                               | 4.3 kB     00:00
epel/primary_db                                                                    | 5.7 MB     00:03
extras                                                                             | 3.4 kB     00:00
extras/primary_db                                                                  |  33 kB     00:00
updates                                                                            | 3.4 kB     00:00
updates/primary_db                                                                 | 2.6 MB     00:01
依存性の解決をしています
--> トランザクションの確認を実行しています。
---> Package docker-io.x86_64 0:1.7.1-2.el6 will be インストール
--> 依存性の処理をしています: xz のパッケージ: docker-io-1.7.1-2.el6.x86_64
--> 依存性の処理をしています: lxc のパッケージ: docker-io-1.7.1-2.el6.x86_64
--> 依存性の処理をしています: libcgroup のパッケージ: docker-io-1.7.1-2.el6.x86_64
--> トランザクションの確認を実行しています。
---> Package libcgroup.x86_64 0:0.40.rc1-16.el6 will be インストール
---> Package lxc.x86_64 0:1.0.7-4.el6 will be インストール
--> 依存性の処理をしています: lua-lxc(x86-64) = 1.0.7-4.el6 のパッケージ: lxc-1.0.7-4.el6.x86_64
--> 依存性の処理をしています: lua-alt-getopt のパッケージ: lxc-1.0.7-4.el6.x86_64
--> 依存性の処理をしています: liblxc.so.1()(64bit) のパッケージ: lxc-1.0.7-4.el6.x86_64
---> Package xz.x86_64 0:4.999.9-0.5.beta.20091007git.el6 will be インストール
--> トランザクションの確認を実行しています。
---> Package lua-alt-getopt.noarch 0:0.7.0-1.el6 will be インストール
---> Package lua-lxc.x86_64 0:1.0.7-4.el6 will be インストール
--> 依存性の処理をしています: lua-filesystem のパッケージ: lua-lxc-1.0.7-4.el6.x86_64
---> Package lxc-libs.x86_64 0:1.0.7-4.el6 will be インストール
--> 依存性の処理をしています: rsync のパッケージ: lxc-libs-1.0.7-4.el6.x86_64
--> トランザクションの確認を実行しています。
---> Package lua-filesystem.x86_64 0:1.4.2-1.el6 will be インストール
---> Package rsync.x86_64 0:3.0.6-12.el6 will be インストール
--> 依存性解決を終了しました。

依存性を解決しました

==========================================================================================================
 パッケージ              アーキテクチャ  バージョン                                   リポジトリー   容量
==========================================================================================================
インストールしています:
 docker-io               x86_64          1.7.1-2.el6                                  epel          4.6 M
依存性関連でのインストールをします。:
 libcgroup               x86_64          0.40.rc1-16.el6                              base          129 k
 lua-alt-getopt          noarch          0.7.0-1.el6                                  epel          6.9 k
 lua-filesystem          x86_64          1.4.2-1.el6                                  epel           24 k
 lua-lxc                 x86_64          1.0.7-4.el6                                  epel           15 k
 lxc                     x86_64          1.0.7-4.el6                                  epel          120 k
 lxc-libs                x86_64          1.0.7-4.el6                                  epel          252 k
 rsync                   x86_64          3.0.6-12.el6                                 base          335 k
 xz                      x86_64          4.999.9-0.5.beta.20091007git.el6             base          137 k

トランザクションの要約
==========================================================================================================
インストール         9 パッケージ

総ダウンロード容量: 5.6 M
インストール済み容量: 22 M
これでいいですか? [y/N]y
パッケージをダウンロードしています:
(1/9): docker-io-1.7.1-2.el6.x86_64.rpm                                            | 4.6 MB     00:03
(2/9): libcgroup-0.40.rc1-16.el6.x86_64.rpm                                        | 129 kB     00:00
(3/9): lua-alt-getopt-0.7.0-1.el6.noarch.rpm                                       | 6.9 kB     00:00
(4/9): lua-filesystem-1.4.2-1.el6.x86_64.rpm                                       |  24 kB     00:00
(5/9): lua-lxc-1.0.7-4.el6.x86_64.rpm                                              |  15 kB     00:00
(6/9): lxc-1.0.7-4.el6.x86_64.rpm                                                  | 120 kB     00:00
(7/9): lxc-libs-1.0.7-4.el6.x86_64.rpm                                             | 252 kB     00:00
(8/9): rsync-3.0.6-12.el6.x86_64.rpm                                               | 335 kB     00:00
(9/9): xz-4.999.9-0.5.beta.20091007git.el6.x86_64.rpm                              | 137 kB     00:00
----------------------------------------------------------------------------------------------------------
合計                                                                      1.2 MB/s | 5.6 MB     00:04
警告: rpmts_HdrFromFdno: ヘッダ V3 RSA/SHA256 Signature, key ID 0608b895: NOKEY
Retrieving key from file:///etc/pki/rpm-gpg/RPM-GPG-KEY-EPEL-6
Importing GPG key 0x0608B895:
 Userid : EPEL (6) 
 Package: epel-release-6-8.noarch (installed)
 From   : /etc/pki/rpm-gpg/RPM-GPG-KEY-EPEL-6
これでいいですか? [y/N]y
warning: rpmts_HdrFromFdno: Header V3 RSA/SHA1 Signature, key ID c105b9de: NOKEY
Retrieving key from file:///etc/pki/rpm-gpg/RPM-GPG-KEY-CentOS-6
Importing GPG key 0xC105B9DE:
 Userid : CentOS-6 Key (CentOS 6 Official Signing Key) 
 Package: centos-release-6-7.el6.centos.12.3.x86_64 (@anaconda-CentOS-201508042137.x86_64/6.7)
 From   : /etc/pki/rpm-gpg/RPM-GPG-KEY-CentOS-6
これでいいですか? [y/N]y
rpm_check_debug を実行しています
トランザクションのテストを実行しています
トランザクションのテストを成功しました
トランザクションを実行しています
警告: RPMDB は yum 以外で変更されました。
  インストールしています  : lua-filesystem-1.4.2-1.el6.x86_64                                         1/9
  インストールしています  : libcgroup-0.40.rc1-16.el6.x86_64                                          2/9
  インストールしています  : lua-alt-getopt-0.7.0-1.el6.noarch                                         3/9
  インストールしています  : xz-4.999.9-0.5.beta.20091007git.el6.x86_64                                4/9
  インストールしています  : rsync-3.0.6-12.el6.x86_64                                                 5/9
  インストールしています  : lxc-libs-1.0.7-4.el6.x86_64                                               6/9
  インストールしています  : lua-lxc-1.0.7-4.el6.x86_64                                                7/9
  インストールしています  : lxc-1.0.7-4.el6.x86_64                                                    8/9
  インストールしています  : docker-io-1.7.1-2.el6.x86_64                                              9/9
  Verifying               : lua-lxc-1.0.7-4.el6.x86_64                                                1/9
  Verifying               : rsync-3.0.6-12.el6.x86_64                                                 2/9
  Verifying               : lxc-1.0.7-4.el6.x86_64                                                    3/9
  Verifying               : xz-4.999.9-0.5.beta.20091007git.el6.x86_64                                4/9
  Verifying               : docker-io-1.7.1-2.el6.x86_64                                              5/9
  Verifying               : lxc-libs-1.0.7-4.el6.x86_64                                               6/9
  Verifying               : lua-alt-getopt-0.7.0-1.el6.noarch                                         7/9
  Verifying               : libcgroup-0.40.rc1-16.el6.x86_64                                          8/9
  Verifying               : lua-filesystem-1.4.2-1.el6.x86_64                                         9/9

インストール:
  docker-io.x86_64 0:1.7.1-2.el6

依存性関連をインストールしました:
  libcgroup.x86_64 0:0.40.rc1-16.el6              lua-alt-getopt.noarch 0:0.7.0-1.el6
  lua-filesystem.x86_64 0:1.4.2-1.el6             lua-lxc.x86_64 0:1.0.7-4.el6
  lxc.x86_64 0:1.0.7-4.el6                        lxc-libs.x86_64 0:1.0.7-4.el6
  rsync.x86_64 0:3.0.6-12.el6                     xz.x86_64 0:4.999.9-0.5.beta.20091007git.el6

完了しました!

以上でインストール自体は終了。
後はDockerをchkconfigの設定と起動をするのですが、dockerはインストール状態だとrootユーザーでないと利用出来ないので、dockerグループに現状のユーザーを追加します。
$ sudo chkconfig docker on
$ sudo service docker start
試しに一般ユーザーでdockerコマンドを叩いてみると下記の様なエラーが出る。
$ docker ps
Get http:///var/run/docker.sock/v1.19/containers/json: dial unix /var/run/docker.sock: permission denied. Are you trying to connect to a TLS-enabled daemon without TLS?
sudoを使えば問題ない。
$ sudo docker ps
CONTAINER ID        IMAGE               COMMAND             CREATED             STATUS              PORTS               NAMES

毎回sudo使うのは嫌なので、docker用のグループに現在のユーザーを追加する。
$ sudo groupadd docker
$ sudo gpasswd -a $USER docker
$ sudo service docker restart
で、一回ターミナルから抜けて、再ログインする。
以上でCentOS6系へのインストール関連の作業は完了。


CentOS7にDockerをインストール

CentOS7へのDockerのインストールは非常に簡単でした。
CentOS6系と違い、特にリポジトリを追加することなく、インストールが可能です。

念のため確認します。
$ yum info docker
読み込んだプラグイン:fastestmirror
Determining fastest mirrors
 * base: www.ftp.ne.jp
 * extras: www.ftp.ne.jp
 * updates: www.ftp.ne.jp
利用可能なパッケージ
名前                : docker
アーキテクチャー    : x86_64
バージョン          : 1.8.2
リリース            : 7.el7.centos
容量                : 8.7 M
リポジトリー        : extras/7/x86_64
要約                : Automates deployment of containerized applications
URL                 : https://github.com/docker/docker ← ちゃんとdockerのURLになっている
ライセンス          : ASL 2.0
説明                : Docker is an open-source engine that automates the deployment of any
                    : application as a lightweight, portable, self-sufficient container that will
                    : run virtually anywhere.
                    :
                    : Docker containers can encapsulate any payload, and will run consistently on
                    : and between virtually any server. The same container that a developer builds
                    : and tests on a laptop will run at scale, in production*, on VMs, bare-metal
                    : servers, OpenStack clusters, public instances, or combinations of the above.

dockerをインストールして、サービス起動する。
$ sudo yum install docker
$ sudo systemctl start docker
また、先ほどと同様にdockerグループを追加して、現在のユーザーをdockerグループに追加し、再ログインする。
$ sudo groupadd docker
$ sudo gpasswd -a $USER docker
$ sudo systemctl restart docker

以上でCentOS7へのインストールも完了です。
どちらのバージョンでもインストールの手間は大したことないので、どちらを選んでも問題ないと思います。
しかし、Dockerの開発スピードはかなり早いので、なるべく最新版を使った方がいいのかもしれません。
2015年11月12日木曜日

Gitの最初のコミットを取り消す

なんか結構な回数最初のコミットをやり直している気がする。
で、毎回忘れてググっているのでメモ。

$ git update-ref -d HEAD

最初ではない、直前のコミットを取り消す
$ git reset --soft HEAD^

2015年11月10日火曜日

iOS9でGmailAPIを使ってみる

iOSアプリでGmailを受信してみたかったので、とりあえずチュートリアルをやってみた。

https://developers.google.com/gmail/api/quickstart/ios?hl=ja&ver=swift

ちなみにこのチュートリアル通りにやると動きません。
iOS9が出たばかりの時にやり始めたので、iOS初心者の自分としては、チュートリアル通りに書いても動かないという状態から抜け出すのに、かなり時間を取られました。
上記のサイトは英語で書かれているので、英語に自信のある方はどうぞ。
そうじゃない方は下記のサイトが参考になります。
ただし、参考にするのは「Gmail APIを有効化する」するところまで。

http://hazakurakeita.hatenablog.com/entry/2015/08/26/Swift%E3%81%A7Gmail_API%E3%82%92%E5%88%A9%E7%94%A8%E3%81%99%E3%82%8B%E6%96%B9%E6%B3%95_/_Gmail_API_iOS_Quickstart

それ以降に関してはCocoaPodsを使ってやった方が早いので、今回はCocoaPodsを使ってやっていきます。
CocoaPodsのインストールがまだ済んでいない方は、各自インストールしておいてください。

では、GmailAPIを有効化して、クライアントIDとクライアントシークレットが確認できたところから開始します。

まずXcodeで適当なプロジェクトを作成します。
自分は「gmailTutorial」というSingleViewApplicationのプロジェクトを作成しました。
作成したディレクトリは下記の通り。

/Users/user_name/Document/iPhoneApps/gmailTutorial

プロジェクトを作成したら一旦作ったプロジェクトは閉じます。

作成したプロジェクトのディレクトリへ移動し、Podfileを作成します。

cd /Users/user_name/Document/iPhoneApps/gmailTutorial
vi Podfile
platform :ios, "7.0"
pod 'Google-API-Client'

上記まで書けたら保存して閉じます。
で、インストール。

$ pod install
Updating local specs repositories
Analyzing dependencies
Downloading dependencies
Installing Google-API-Client (1.0.422)
Installing gtm-http-fetcher (1.0.141)
Installing gtm-oauth2 (1.0.126)
Generating Pods project
Integrating client project

[!] Please close any current Xcode sessions and use `gmailTutorial.xcworkspace` for this project from now on.
Sending stats
Pod installation complete! There is 1 dependency from the Podfile and 3 total
pods installed.

現在の階層に作成されている「gmailTutorial.xcworkspace」をXcodeで開きます。
で、プロジェクトナビゲーターの、
Pods → Pods → Google-API-Client → Gmail → GTLGmail.h

gmailTutorial → gmailTutorial → GTLGmail.h
にドラッグアンドドロップする。
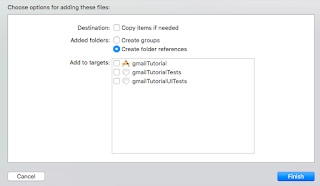
下記のような画面が出てくるが、そのままfinishボタンを押す。


続いて、
Pods → Pods → gtm-oauth2 → GTMOAuth2ViewControllerTouch.h

gmailTutorial → gmailTutorial → GTMOAuth2ViewControllerTouch.h
にドラッグアンドドロップする。
先ほどと同じく、そのままfinishボタンを押す。


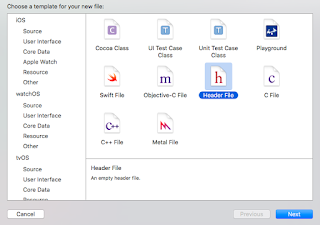
次に、SwiftからObjective-Cのライブラリを呼び出すために必要なBridgeファイルを作成する。
作成するBridgeファイルの名前は下記の通りとする。(各自プロジェクトに置き換えて作成してください。)
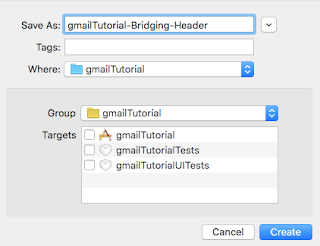
gmailTutorial-Bridging-Header.h
File → New → Fileで、下記の画面が出てくる。

先ほどのブリッジファイル名を入力して作成する。


ファイルの中身は下記の通り。

#ifndef gmailTutorial_Bridging_Header_h
#define gmailTutorial_Bridging_Header_h

#import <GTMOAuth2ViewControllerTouch.h> ← これを追記
#import <GTLGmail.h> ← これを追記

#endif /* gmailTutorial_Bridging_Header_h */

続いて、プロジェクトナビゲーターの「gmailTutorial(アイコンが青色のやつ)」をクリックし、真ん中の画面に出てきたBuild Settingsのメニューを選択 Objective-C Bridging Headerの項目にgmailTutorial-Bridging-Header.hファイルのパスを記載する。

$(SRCROOT)/$(PROJECT)/$(SWIFT_MODULE_NAME)-Bridging-Header.h

こんな感じで記載すると、確定したタイミングで実際のパスに書き換えてくれる。
階層構造が異なっている場合は、不要な部分を削除してください。

続いて、チュートリアルに書かれているSwiftのコードをコピペして使えれば良かったのだが、Xcode7でiOS9に対応させようとするとエラーが出る箇所があるので、下記ソースをコピペして下さい。

import UIKit

class ViewController: UIViewController {
    
    private let kKeychainItemName = "Gmail API"
    private let kClientID = "YOUR_CLIENT_ID_HERE"
    private let kClientSecret = "YOUR_CLIENT_SECRET_HERE"
    
    private let scopes = [kGTLAuthScopeGmailReadonly]
    
    private let service = GTLServiceGmail()
    let output = UITextView()
    
    // When the view loads, create necessary subviews
    // and initialize the Gmail API service
    override func viewDidLoad() {
        super.viewDidLoad()
        
        output.frame = view.bounds
        output.editable = false
        output.contentInset = UIEdgeInsets(top: 20, left: 0, bottom: 20, right: 0)
        //output.autoresizingMask = UIViewAutoresizing.FlexibleHeight |
        //    UIViewAutoresizing.FlexibleWidth
        output.autoresizingMask = UIViewAutoresizing([.FlexibleHeight, .FlexibleWidth])
        
        view.addSubview(output);
        
        GTMOAuth2ViewControllerTouch.authForGoogleFromKeychainForName(
            kKeychainItemName,
            clientID: kClientID,
            clientSecret: kClientSecret
        )
        
    }
    
    // When the view appears, ensure that the Gmail API service is authorized
    // and perform API calls
    override func viewDidAppear(animated: Bool) {
        if let authorizer = service.authorizer,
            canAuth = authorizer.canAuthorize where canAuth {
                fetchLabels()
        } else {
            presentViewController(
                createAuthController(),
                animated: true,
                completion: nil
            )
        }
    }
    
    // Construct a query and get a list of upcoming labels from the gmail API
    func fetchLabels() {
        output.text = "Getting labels..."
        
        //let query = GTLQueryGmail.queryForUsersLabelsList()
        let query = GTLQueryGmail.queryForUsersLabelsList() as! GTLQuery
        service.executeQuery(query,
            delegate: self,
            didFinishSelector: "displayResultWithTicket:finishedWithObject:error:"
        )
    }
    
    // Display the labels in the UITextView
    func displayResultWithTicket(ticket : GTLServiceTicket,
        finishedWithObject labelsResponse : GTLGmailListLabelsResponse,
        error : NSError?) {
            
            if let error = error {
                showAlert("Error", message: error.localizedDescription)
                return
            }
            
            var labelString = ""
            
            if !labelsResponse.labels.isEmpty {
                labelString += "Labels:\n"
                for label in labelsResponse.labels as! [GTLGmailLabel] {
                    labelString += "\(label.name)\n"
                }
            } else {
                labelString = "No labels found."
            }
            
            output.text = labelString
            
    }
    
    
    // Creates the auth controller for authorizing access to Gmail API
    private func createAuthController() -> GTMOAuth2ViewControllerTouch {
        //let scopeString = " ".join(scopes)
        let scopeString = scopes.joinWithSeparator(" ")
        return GTMOAuth2ViewControllerTouch(
            scope: scopeString,
            clientID: kClientID,
            clientSecret: kClientSecret,
            keychainItemName: kKeychainItemName,
            delegate: self,
            finishedSelector: "viewController:finishedWithAuth:error:"
        )
    }
    
    // Handle completion of the authorization process, and update the Gmail API
    // with the new credentials.
    func viewController(vc : UIViewController,
        finishedWithAuth authResult : GTMOAuth2Authentication, error : NSError?) {
            
            if let error = error {
                service.authorizer = nil
                showAlert("Authentication Error", message: error.localizedDescription)
                return
            }
            
            service.authorizer = authResult
            dismissViewControllerAnimated(true, completion: nil)
    }
    
    // Helper for showing an alert
    func showAlert(title : String, message: String) {
        let alert = UIAlertView(
            title: title,
            message: message,
            delegate: nil,
            cancelButtonTitle: "OK"
        )
        alert.show()
    }
    
    override func didReceiveMemoryWarning() {
        super.didReceiveMemoryWarning()
        // Dispose of any resources that can be recreated.
    }
    
}


以上でチュートリアルの内容は終了。
YOUR_CLIENT_ID_HEREとYOUR_CLIENT_SECRET_HEREは、各自書き換えて使って下さい。
書き換えた部分はコメントアウトしてあるので、見てもらえればわかるかと思います。
ログインするとGmailのラベルの一覧が表示されるはず。