page_adsence

2015年2月13日金曜日

Ansibleで作った環境をServerspecでテストする

ServerspecとはAnsibleやChef、Puppetといったプロビジョニングツールで作成された環境が、本当に意図した通りに作成されているのかをテストするためのツール。
Rubyで書かれていて、RubyのテストフレームワークであるRSpecの書き方に準拠している。

説明はこのくらいにして、実際に使ってみる。
テストする環境としては、自分のローカルPC上に作成したVMマシンで、
既にVagrant、VirtualBox、Ansibleが使える状態になっている。
今回、ServerspecでテストするサーバはVagrant使って新しいVMを作っておく。

まずはインストールから。
gemがインストールしてあることが前提。

user_name@computer_name ~
$ gem install serverspec
DL is deprecated, please use Fiddle
Fetching: rspec-support-3.2.1.gem (100%)
Successfully installed rspec-support-3.2.1
Fetching: rspec-mocks-3.2.0.gem (100%)
Successfully installed rspec-mocks-3.2.0
Fetching: rspec-expectations-3.2.0.gem (100%)
Successfully installed rspec-expectations-3.2.0
Fetching: rspec-core-3.2.0.gem (100%)
Successfully installed rspec-core-3.2.0
Fetching: rspec-3.2.0.gem (100%)
Successfully installed rspec-3.2.0
Fetching: rspec-its-1.1.0.gem (100%)
Successfully installed rspec-its-1.1.0
Fetching: multi_json-1.10.1.gem (100%)
Successfully installed multi_json-1.10.1
Fetching: net-scp-1.2.1.gem (100%)
Successfully installed net-scp-1.2.1
Fetching: specinfra-2.12.7.gem (100%)
Successfully installed specinfra-2.12.7
Fetching: serverspec-2.8.2.gem (100%)
Successfully installed serverspec-2.8.2
Parsing documentation for multi_json-1.10.1
Installing ri documentation for multi_json-1.10.1
Parsing documentation for net-scp-1.2.1
Installing ri documentation for net-scp-1.2.1
Parsing documentation for rspec-3.2.0
Installing ri documentation for rspec-3.2.0
Parsing documentation for rspec-core-3.2.0
Installing ri documentation for rspec-core-3.2.0
Parsing documentation for rspec-expectations-3.2.0
Installing ri documentation for rspec-expectations-3.2.0
Parsing documentation for rspec-its-1.1.0
Installing ri documentation for rspec-its-1.1.0
Parsing documentation for rspec-mocks-3.2.0
Installing ri documentation for rspec-mocks-3.2.0
Parsing documentation for rspec-support-3.2.1
Installing ri documentation for rspec-support-3.2.1
Parsing documentation for serverspec-2.8.2
Installing ri documentation for serverspec-2.8.2
Parsing documentation for specinfra-2.12.7
Installing ri documentation for specinfra-2.12.7
Done installing documentation for multi_json, net-scp, rspec, rspec-core, rspec-expectations, rspec-its, rspec-mocks, rspec-support, serverspec, specinfra after 40 seconds
10 gems installed

次にテストしたいVMのVagrantfileがあるディレクトリへ移動。
自分の場合は下記のディレクトリだったので、そこへ移動。

user_name@computer_name ~
$ cd VirtualBoxMachines/test

でserverspecを初期化する。

user_name@computer_name ~/VirtualBoxMachines/test
$ serverspec-init
DL is deprecated, please use Fiddle
Select OS type:

  1) UN*X
  2) Windows

Select number: 1 ← serverspecでチェックするマシンがUnix系なのかWindows系なのかを選択

Select a backend type:

  1) SSH
  2) Exec (local)

Select number: 1 ← SSHで接続するリモートサーバなのか、ローカルサーバなのか。

Vagrant instance y/n: y ← Vagrantで作成したマシンなのか
Auto-configure Vagrant from Vagrantfile? y/n: y ← Vagrantfileを元にしてserverspecの設定ファイルを勝手に作ってくれる
 + spec/
 + spec/default/
 + spec/default/sample_spec.rb
 + spec/spec_helper.rb
 + Rakefile
 + .rspec

初期化すると、上記に書かれているファイルができている。
特に修正するわけでもなく、早速テストしてみる。

user_name@computer_name ~/VirtualBoxMachines/test
$ rake spec
rake aborted!
Circular dependency detected: TOP => spec => spec:all => spec:default => spec:all

Tasks: TOP => spec => spec:all => spec:default
(See full trace by running task with --trace)

エラーになった・・・。
原因をググって見ると、下記の様な記事が出てきたので、とりあえず記事通りに修正してみる。
https://saintaardvarkthecarpeted.com/blog/archive/2014/10/_Circular_dependency_detected__error_in_ServerSpec.html

user_name@computer_name ~/VirtualBoxMachines/test
$ vim Rakefile
require 'rake'
require 'rspec/core/rake_task'

task :spec    => 'spec:all'
task :default => :spec

namespace :spec do
  targets = []
  Dir.glob('./spec/*').each do |dir|
    next unless File.directory?(dir)
    targets << File.basename(dir)
  end

  task :all     => targets
  # task :default => :all ← ここをコメントアウトする

  targets.each do |target|
    desc "Run serverspec tests to #{target}"
    RSpec::Core::RakeTask.new(target.to_sym) do |t|
      ENV['TARGET_HOST'] = target
      t.pattern = "spec/#{target}/*_spec.rb"
    end
  end
end

もう一回試しに走らせてみる。
user_name@computer_name ~/VirtualBoxMachines/test
$ rake spec
/usr/local/bin/ruby.exe -I'/usr/local/lib/ruby/gems/2.1.0/gems/rspec-support-3.2.1/lib':'/usr/local/lib/ruby/gems/2.1.0/gems/rspec-core-3.2.0/lib' '/usr/local/lib/ruby/gems/2.1.0/gems/rspec-core-3.2.0/exe/rspec' --pattern 'spec/default/*_spec.rb'
DL is deprecated, please use Fiddle

Package "httpd"
  should be installed (FAILED - 1)

Service "httpd"
  should be enabled (FAILED - 2)
  should be running (FAILED - 3)

Port "80"
  should be listening (FAILED - 4)

Failures:

  1) Package "httpd" should be installed
     On host `default'
     Failure/Error: it { should be_installed }
       expected Package "httpd" to be installed
       sudo -p 'Password: ' /bin/sh -c rpm\ -q\ httpd
       package httpd is not installed

     # ./spec/default/sample_spec.rb:4:in `block (2 levels) in '

  2) Service "httpd" should be enabled
     On host `default'
     Failure/Error: it { should be_enabled }
       expected Service "httpd" to be enabled
       sudo -p 'Password: ' /bin/sh -c chkconfig\ --list\ httpd\ \|\ grep\ 3:on

     # ./spec/default/sample_spec.rb:8:in `block (2 levels) in '

  3) Service "httpd" should be running
     On host `default'
     Failure/Error: it { should be_running }
       expected Service "httpd" to be running
       sudo -p 'Password: ' /bin/sh -c ps\ aux\ \|\ grep\ -w\ --\ httpd\ \|\ grep\ -qv\ grep

     # ./spec/default/sample_spec.rb:9:in `block (2 levels) in '

  4) Port "80" should be listening
     On host `default'
     Failure/Error: it { should be_listening }
       expected Port "80" to be listening
       sudo -p 'Password: ' /bin/sh -c netstat\ -tunl\ \|\ grep\ --\ :80\\\

     # ./spec/default/sample_spec.rb:13:in `block (2 levels) in '

Finished in 0.33207 seconds (files took 19.95 seconds to load)
4 examples, 4 failures

Failed examples:

rspec ./spec/default/sample_spec.rb:4 # Package "httpd" should be installed
rspec ./spec/default/sample_spec.rb:8 # Service "httpd" should be enabled
rspec ./spec/default/sample_spec.rb:9 # Service "httpd" should be running
rspec ./spec/default/sample_spec.rb:13 # Port "80" should be listening

/usr/local/bin/ruby.exe -I'/usr/local/lib/ruby/gems/2.1.0/gems/rspec-support-3.2.1/lib':'/usr/local/lib/ruby/gems/2.1.0/gems/rspec-core-3.2.0/lib' '/usr/local/lib/ruby/gems/2.1.0/gems/rspec-core-3.2.0/exe/rspec' --pattern 'spec/default/*_spec.rb' failed

テストは通ってない(apacheインストールしてないので当然ですが)けど、動きました。
真っ赤っ赤で不安になる。
ちなみにテストが通る様になった時の結果がこれ。

user_name@computer_name ~/VirtualBoxMachines/test
$ rake spec
/usr/local/bin/ruby.exe -I'/usr/local/lib/ruby/gems/2.1.0/gems/rspec-support-3.2.1/lib':'/usr/local/lib/ruby/gems/2.1.0/gems/rspec-core-3.2.0/lib' '/usr/local/lib/ruby/gems/2.1.0/gems/rspec-core-3.2.0/exe/rspec' --pattern 'spec/default/*_spec.rb'
DL is deprecated, please use Fiddle

Package "httpd"
  should be installed

Service "httpd"
  should be enabled
  should be running

Port "80"
  should be listening

Finished in 0.1375 seconds (files took 15.45 seconds to load)
4 examples, 0 failures

緑色になって安心。
こうなるまでひたすらAnsibleのplaybookを修正し続ける。

2015年2月12日木曜日

AnsibleでSELinuxの状態を調べて、既に無効だったらスキップする

前回、SELinuxをOFFにする方法を書いたので、その続きというか発展編。
やり方としてはこんな感じ。

    - name: SELinuxの現状のステータスを確認し、結果を保存する
      shell: getenforce               ← ステータス確認コマンド
      register: is_selinux_off            ← 結果を「is_selinux_off」に保存

    - name: Install libselinux-python
      yum: name=libselinux-python state=installed
      when: is_selinux_off.stdout == 'Enforcing'   ← SELinuxのステータスが「Enforcing」だった場合は処理する

    - name: disable selinux
      selinux: state=disabled
      when: is_selinux_off.stdout == 'Enforcing'   ← 上と同様

    - include: reboot.yml
      when: is_selinux_off.stdout == 'Enforcing'   ← 上と同様

registerにどういった内容が入っているのかを確認するにはこんな感じにするとよい。

    - name: SELinuxの現状のステータスを確認し、結果を保存する
      shell: getenforce
      register: is_selinux_off

    - debug: var=is_selinux_off
      when: is_selinux_off

上記の実行結果の一部がこんな感じ。

TASK: [debug var=is_selinux_off] **********************************************
ok: [xwindow] => {
    "is_selinux_off": {
        "changed": true,
        "cmd": "getenforce",
        "delta": "0:00:00.003592",
        "end": "2015-02-12 18:12:03.063290",
        "invocation": {
            "module_args": "getenforce",
            "module_name": "shell"
        },
        "rc": 0,
        "start": "2015-02-12 18:12:03.059698",
        "stderr": "",
        "stdout": "Enforcing",
        "stdout_lines": [
            "Enforcing"
        ],
        "warnings": []
    }
}

MacからAWSで作成したWindows8のマシンにリモートデスクトップで接続出来ない

AWSで作ったWindows8のマシンを手に入れたのですが、Macから直接リモートデスクトップで接続しようとすると、
以下の様なエラーが出てきて接続出来なかった。

「接続先のコンピューターのIDを確認できません。」

そのせいで、MacbookPro→Parallels上のWindows7→Windows8見たいな感じで接続しないと使えなかった。
Macから直接使えないと意味ない(Macbook Airから主に使いたいため)と思い、調べてみたら案外あっさり見つかった。

AWSに作ったWindowsマシンに接続する為に使っていたアプリは、

Microsoft Remote Desktop Connection Client for Mac

どうやらこれがいけないというか、このアプリだとWindows8側で設定を諸々変更する必要があるらしい。
ちょっと面倒だったのですが、何個か別の記事を読んでみると、どうやら別のアプリを落とすだけでいけるらしい事がわかった。
そのアプリはApple Storeで公開されている「Microsoft Remote Desktop」を使えば問題ない。

早速試してみた。
Apple Storeにいって「Microsoft Remote Desktop」で検索すると、一発で出てきた。
赤いアイコンで目立つ感じ。

早速インストールして接続。
全部英語ですが、そんなに難しい単語は使われていないので、特に問題ないと思います。
※入力した内容を保存するボタンが無いので、ちょっと不安な気持ちになりますが、閉じるボタンを押したタイミングで勝手に保存されるようです。


Windows8側の設定を変える方法として、以下の様な方法があります。
新しくアプリ落とす方が面倒だという方はこちらの方法を試してみてください。
設定を変更することで接続出来ることは確認しました。

1.検索で「gpedit.msc」を入力。
2.下記のようにツリーを辿って、セキュリティを選択。
ローカルコンピューターポリシー
 │
 └ コンピューターの構成
    │
    └ 管理者用テンプレート
      │
      └ Windowsコンポーネント
         │
         └ リモート デスクトップ サービス
           │
           └ リモート デスクトップ セッションホスト
               │
              └ セキュリティ ← ここを選択


「リモート(RDP)接続に特定のセキュリティレイヤーの使用を必要とする」を有効にし、セキュリティレイヤーをRDPに変更する

「リモート接続にネットワークレベル認証を使用したユーザー認証を必要とする」を無効にする

以上の設定が終わったら再起動して、再接続してみるとつながった。

AWSアカウントを作って、Windowsマシンを手に入れる

1年間無料で使えるので、AWSでどこからでも使えるWindowsマシンを手に入れようかと思い、アカウントを作ってみた。

登録フローは公式サイトに書かれているので、そちらを参考に。

で、Windowsマシンを作ってみる。
まず、以下のサイトにアクセス。

http://aws.amazon.com/jp/
コンソールへサインインボタンをクリック

Emailアドレスとパスワードを入力してログイン

ログインが完了すると、マネージメントコンソールという画面が開く。
画面左上のEC2をクリック

Launch Instanceボタンをクリック

作りたいOSを選ぶ
但し、無料で使えるOSの種類は限られているので、「Free tier only」にチェックを付けて無料で使えるやつのみをリスト上に表示させるとよい。

インスタンスタイプを選ぶ
無料のものは一番上のもののみなので、自動的にこれを選ぶ事になる。

作成するインスタンスの詳細を選択する。
基本的には赤線で囲ってある部分を両方チェックしておく。

ストレージのサイズを決める
特に問題がなければそのままにしておく。
30GBまでは無料で使えるので、30GBにした。

インスタンスの名前を決める

セキュリティグループを選ぶ。
Windowsマシンを選択した場合、自動でここがRDPになっているので、基本的には何もしなくてもOK。

作成されるマシンの内容を確認し、起動ボタンを押す。

鍵を作成してダウンロード後、インスタンスを起動させる。

これでとりあえずマシンの作成は完了。
次に作成したマシンにログインするまでの方法。
マネージメントコンソールTOPから、Instancesをクリック

起動させたいマシンを選んで、Connectボタンを押す。(ここからVMに繋がるわけではない。)

ログインパスワードを取得する。

マシンを作った時にダウンロードした鍵ファイルをアップロードして、パスワードを抽出する。

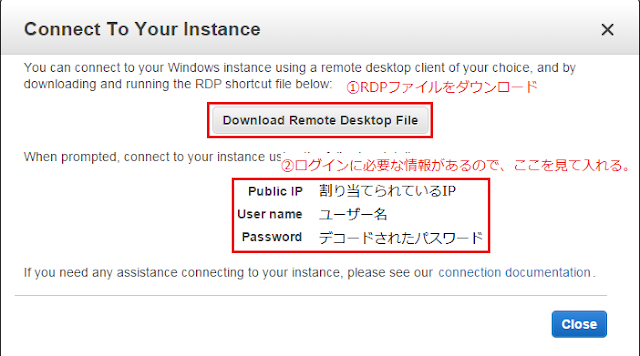
リモートデスクトップファイルをダウンロードして、
ユーザー名、抽出されたパスワードやIPが表示されているので、これを元にリモートデスクトップで接続する。

※MacからWindows8系にリモートデスクトップ接続する場合に接続できない事があるが、それは別の記事で。
結論としては、Apple Storeに公開されているMicrosoft Remote Desktopを使えば問題なく接続出来るということです。

2015年2月5日木曜日

AnsibleでSELinuxをOFFにする方法

AnsibleでSELinuxをOFFにするための方法を調べてみた。

ググってみると下記の記事が見つかった。

Ansibleの事例とちょっとしたTips

この部分を見ながらやってみたが、どうもうまく行かない。
ymlの記述を全く同じにしてみてもうまくいかない。

-bash: sudo: コマンドが見つかりません

なんで記事中ではうまくいってるのに、自分の環境じゃダメなのかと思ったのですが、
原因は自分の環境がCygwin環境だからでした。
なので、下記のように修正してやってみる。

---
- name: Install libselinux-python
  yum: name=libselinux-python state=present

- name: Check status of selinux
  shell: getenforce

- name: Permissive selinux
  selinux: policy=targeted state=permissive

- name: reboot after change selinux
  shell: sleep 2s && /sbin/reboot &

- name: wait for the server to go down (reboot)
  local_action: wait_for host={{ inventory_hostname }} port=22 state=stopped
  sudo: no

- name: wait for the server to come up
  local_action: wait_for host={{ inventory_hostname }} port=22 delay=30
  sudo: no

- name: Check status of selinux
  shell: getenforce

再起動自体は行われたが、後続が続かない。
何をやってもダメで、他の方法を探してみた。

で、見つけた記事がこれ。

Ansible で Vagrant ホストを再起動する

「wait_for で待つ方法だと ansible-playbook が再起動以降でコケたり共有フォルダーがマウントされなくなったりとダメ。」
という記述を見つけて愕然。
今まで色々と試行錯誤してみたけど、無駄だったことが発覚。
とりあえず、この方法で出来るのかを検証してみることにした。

$ vi selinux-off.yml

---
- name: Install libselinux-python
  yum: name=libselinux-python state=installed

- name: disable SELinux
  sudo: yes
  selinux: state=disabled

- include: reboot.yml

$ vi reboot.yml

---
- name: reboot vagrant host
  command: 'vagrant reload'
  delegate_to: 127.0.0.1
  changed_when: false

この様な感じでファイルを用意して試してみたら、見事成功。
ということで、この方法を採用してplaybookを作っていきたいと思います。

2015年2月3日火曜日

vagrantコマンドでよく使うもの

vagrantのコマンドでよく使うものを中心にメモしておく。
vagrant box add
boxの追加。
boxを追加しておくと、すでにあるLinuxイメージをローカルにダウンロードし、登録しておくイメージ。
追加されたboxは初期化することですぐに利用出来る様になる。
boxのダウンロードはある程度時間が掛かる。
boxファイルは色々な所に落ちているが、下記の様にまとめサイト的なものもある。

http://www.vagrantbox.es/

$ vagrant box add [box-name] [box-url]

例)
$ vagrant box add centos6.4 https://github.com/2creatives/vagrant-centos/releases/download/v6.5.3/centos65-x86_64-20140116.box

vagrant box list
すでに追加されているboxの一覧を確認する。
今までbox addコマンドで追加したboxの一覧が確認出来る。

$ vagrant box list

例)
$ vagrant box list
centos6.4       (virtualbox, 0)
centos6.4-30gb  (virtualbox, 0)
centos6.4-nomal (virtualbox, 0)
centos6.5       (virtualbox, 0)
centos7.0       (virtualbox, 0)
test            (virtualbox, 0)

vagrant box remove
すでに追加してあるboxファイルを削除する。

$ vagrant box remove [box name]

例)
$ vagrant box remove test
Removing box 'test' (v0) with provider 'virtualbox'...

$ vagrant box list
centos6.4       (virtualbox, 0)
centos6.4-30gb  (virtualbox, 0)
centos6.4-nomal (virtualbox, 0)
centos6.5       (virtualbox, 0)
centos7.0       (virtualbox, 0)

vagrant init
boxを初期化する。
これをする事でVagrantfileが作成され、VMの細かい設定が出来るようになる。

$ vagrant init [box-name]

例)
$ vagrant init centos6.4
A `Vagrantfile` has been placed in this directory. You are now
ready to `vagrant up` your first virtual environment! Please read
the comments in the Vagrantfile as well as documentation on
`vagrantup.com` for more information on using Vagrant.

vagrant up
VMを起動する。Vagrantfileに書かれた内容に基づいたVMが作成され、起動する。

$ vagrant up

例)
$ vagrant up
Bringing machine 'default' up with 'virtualbox' provider...
==> default: Importing base box 'centos6.4'...
==> default: Matching MAC address for NAT networking...
==> default: Setting the name of the VM: test-vm
==> default: Clearing any previously set network interfaces...
==> default: Preparing network interfaces based on configuration...
    default: Adapter 1: nat
    default: Adapter 2: hostonly
==> default: Forwarding ports...
    default: 22 => 2222 (adapter 1)
==> default: Running 'pre-boot' VM customizations...
==> default: Booting VM...
==> default: Waiting for machine to boot. This may take a few minutes...
    default: SSH address: 127.0.0.1:2222
    default: SSH username: vagrant
    default: SSH auth method: private key
    default: Warning: Connection timeout. Retrying...
    default: Warning: Connection timeout. Retrying...
==> default: Machine booted and ready!
==> default: Checking for guest additions in VM...
==> default: Configuring and enabling network interfaces...
==> default: Mounting shared folders...
    default: /vagrant => C:/cygwin64/home/username/VirtualBoxMachines/test-vm

vagrant halt
VMを停止する。

$ vagrant halt
==> default: Attempting graceful shutdown of VM...

vagrant suspend
VMを一時停止する

$ vagrant suspend
==> default: Saving VM state and suspending execution...

vagrant resume
一時停止されているVMを再開させる

$ vagrant resume
==> default: Resuming suspended VM...
==> default: Booting VM...
==> default: Waiting for machine to boot. This may take a few minutes...
    default: SSH address: 127.0.0.1:2222
    default: SSH username: vagrant
    default: SSH auth method: private key
==> default: Machine booted and ready!

vagrant status
VMのステータスを確認出来る

$ vagrant status
Current machine states:

default                   running (virtualbox)

The VM is running. To stop this VM, you can run `vagrant halt` to
shut it down forcefully, or you can run `vagrant suspend` to simply
suspend the virtual machine. In either case, to restart it again,
simply run `vagrant up`.

vagrant ssh
vagrant経由で起動させたVMにsshでログインする

$ vagrant ssh
Last login: Tue Feb  3 10:49:53 2015 from 192.168.33.100
[vagrant@vagrant ~]$

vagrant global-status
vagrant全体の状況が確認出来る。1度起動したVMはIDが振られる。
このIDを指定することで、対象のVMディレクトリ配下に移動しなくても起動出来る。

$ vagrant global-status
id       name    provider   state    directory
--------------------------------------------------------------------------------------------------
6dd4f19  default virtualbox saved    C:/cygwin64/home/user-name/vbox-cent64
b735130  default virtualbox poweroff C:/cygwin64/home/user-name/VirtualBoxMachines/vbox-cent64-1

The above shows information about all known Vagrant environments
on this machine. This data is cached and may not be completely
up-to-date. To interact with any of the machines, you can go to
that directory and run Vagrant, or you can use the ID directly
with Vagrant commands from any directory. For example:
"vagrant destroy 1a2b3c4d"

vagrant global-status --prune
global-statusで確認した時、本来削除したはずのVMの管理情報が残っている場合がある。
そういった不要情報を綺麗にした状態にするためのオプションが「prune」

■通常のコマンドでステータス確認
$ vagrant global-status
id       name    provider   state    directory
------------------------------------------------------------------------------------------------------
17033d9  default virtualbox poweroff C:/cygwin64/home/user-name/virtualBox                            ← 削除済みなのに表示されている
754da86  default virtualbox poweroff C:/cygwin64/home/user-name/virtualBox_CentOS6.5                  ← 削除済みなのに表示されている
6dd4f19  default virtualbox poweroff C:/cygwin64/home/user-name/vbox-cent64
e8c4ab5  default virtualbox poweroff C:/cygwin64/home/user-name/VirtualBoxMachines/vbox-cent64-1-tmp  ← 削除済みなのに表示されている
2de0695  default virtualbox running  C:/cygwin64/home/user-name/VirtualBoxMachines/vbox-cent64-1

The above shows information about all known Vagrant environments
on this machine. This data is cached and may not be completely
up-to-date. To interact with any of the machines, you can go to
that directory and run Vagrant, or you can use the ID directly
with Vagrant commands from any directory. For example:
"vagrant destroy 1a2b3c4d"

■削除済み情報を綺麗にして表示させる。
$ vagrant global-status --prune
C:/cygwin64/home/user-name/vbox-cent64/Vagrantfile:5: warning: already initialized constant VAGRANTFILE_API_VERSION
C:/cygwin64/home/user-name/virtualBox_CentOS6.5/Vagrantfile:5: warning: previous definition of VAGRANTFILE_API_VERSION was here
C:/cygwin64/home/user-name/VirtualBoxMachines/vbox-cent64-1/Vagrantfile:5: warning: already initialized constant VAGRANTFILE_API_VERSION
C:/cygwin64/home/user-name/vbox-cent64/Vagrantfile:5: warning: previous definition of VAGRANTFILE_API_VERSION was here
id       name    provider   state    directory
--------------------------------------------------------------------------------------------------
6dd4f19  default virtualbox poweroff C:/cygwin64/home/user-name/vbox-cent64
2de0695  default virtualbox running  C:/cygwin64/home/user-name/VirtualBoxMachines/vbox-cent64-1

The above shows information about all known Vagrant environments
on this machine. This data is cached and may not be completely
up-to-date. To interact with any of the machines, you can go to
that directory and run Vagrant, or you can use the ID directly
with Vagrant commands from any directory. For example:
"vagrant destroy 1a2b3c4d"
C:/cygwin64/home/user-name/VirtualBoxMachines/vbox-cent64-1/Vagrantfile:5: warning: already initialized constant VAGRANTFILE_API_VERSION
C:/cygwin64/home/user-name/VirtualBoxMachines/vbox-cent64-1/Vagrantfile:5: warning: previous definition of VAGRANTFILE_API_VERSION was here

vagrant destroy
作成されているVMを削除する。このコマンドを実行することで、VirtualBox上からもマシンが消える。
また、global-statusに出てくるIDを末尾につけることで、該当のVMのディレクトリに移動しなくても削除する事が可能。

$ vagrant destroy

vagrant box repackage
既に追加済みのBoxをカレントディレクトリにpackage.boxファイルとして出力する。

$ vagrant box repackage [provider_name] [version]

providerやversionはvagrant box listコマンドを打つと出てくる
$ vagrant box list
centos6.4       (virtualbox, 0)

この場合、コマンドは下記の様になる。
$ vagrant box repackage virtualbox 0


※下記のURLに綺麗にまとまっている。但しglobal-statusに関しては記載なし。
http://lab.raqda.com/vagrant/cli/